You cannot place a new order from your country. United States

Adjustable pedestal 8-20 mm for slabs, tiles or ceramics - Jouplast

JOUPLAST

Reference :

Available stock

shipment in 24/48h
Your orders are shipped
Customer service
Our teams are at your disposal from Monday to Friday from 9am to 6pm
D.T.U. Standards
All our products comply with current standards
secure payment
Our site is protected by an SSL certificate
the guarantees plots-discount.com
Dessin technique du plot terrasse dalle Essentiel 8/20 de Jouplast

Pedestal for tiled terrace height adjustable from 8 to 20 mm - Jouplast

Paving terrace pedestal adjustable in height from 8 to 20 mm for creating terraces with outdoor tiles, porcelain stoneware, concrete pavings and gratings. This low-height terrace pedestal is made up of an adjustable pedestal from 8 to 15 mm and a 5 mm riser. This paving pedestal can be manually adjusted notch by notch and is ideal for renovating an existing terrace.

The advantages of Jouplast's 10 mm paving terrace pedestal

  • Speed and ease of installation
  • Installation without fixing or joint
  • Manual and precise height adjustment thanks to the black nut
  • Frost and UV resistant
  • Allows air to circulate under the structure
  • Allows the passage of cables and pipes
  • Withstands more than a ton of load
  • Complies with DTU 43.1

Tips for laying a tiled terrace on pedestals

  • The laying is carried out on a concrete paving, a lean screed, a tiled terrace to be renovated or soft ground
  • The slab terrace pedestal is intended for outdoor and pedestrian use
  • Provide an inclination of 1 cm per linear meter to promote the evacuation of rainwater, regardless of the support;
  • It is mandatory to use self-supporting slabs, of class T7 or T11 according to standard NF EN 1339 or F+;
  • Given its low height, the 8/20 mm slab terrace pedestal cannot be used with extensions.

Steps for laying a terrace on a tiled pedestal

1/ Ground preparation

It all starts with the ground that will host your future terrace. It must be perfectly flat and stable so that your structure supports the daily use that is made of it. This step should not be overlooked since it allows your paving terrace on pedestal to stay in place no matter what.


Here is what you need for the preparation : 

  • A cord
  • Stakes
  • A spirit level
  • A shovel
  • A tape measure
  • A mason's box screed
  • A geotextile film
  • Gravel

To do this, simply follow these instructions to the letter if your terrace is going to come to life on ground other than a concrete paving:

  1. Dig the ground for 15 cm;
  2. Place a geotextile felt there to eradicate the growth of weeds and save you additional maintenance;
  3. Fill the hole with a 15 cm layer of gravel. This layer of gravel can be divided into two distinct parts. A first draining layer with crushed gravel type 30/60 or 40/80. A second layer of 0/4 type quarry or crushed sand will hide the defects and facilitate the installation of your 8/20 mm paving pedestals;
  4. Compact and make sure everything is level.

2/ Lay the pedestals and the paving tiles

To promote a sustainable terrace, be sure to choose self-supporting pavings and call on an outside person to help you carry them without injuring yourself. Do not panic, each pedestal paving resists up to more than a ton of load!


Laying the pedestals is within everyone's reach and only requires 4 steps. Indeed, laying pedestals and slabs is as simple as pie. Note that it takes 4 pedestals per paving for dimensions up to 60 x 60 cm. Beyond that, provide one or two central pedestals that you will install under the pavings by breaking the spacers. 


By following these instructions, the preparation is carried out in a simple and fast way:

  1. Position the pedestals on the ground following the layout plan that you have previously drawn up;
  2. Add an acoustic rubber on the head of each of the paving pedestals to avoid vibrations and offer you optimal sound comfort;
  3. Lay the paving tiles against the spacers;
  4. Finally, turn the nut to adjust the height of the pedestal to the desired level.

Accessories for laying a tiled terrace on a Jouplast pedestal

Technical characteristics

  • Complies with DTU 43.1
  • Load resistance greater than 1 ton
  • Frost and UV resistant
  • Flange diameter: 170 mm
  • Head diameter: 120 mm
  • Adjustable height: 8 to 20 mm

 
The steps of installation a terrace on pedestals

The installation of a terrace on a pedestal is the easiest and quickest method to set up: follow the assembly steps and build your terrace in less than 3 days!


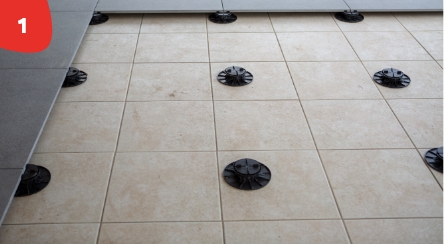
step 1Determine the required spacing, place the pedestals on the ground, adjust them and check everything with a spirit level.

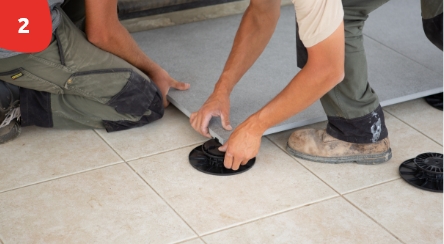
step Once the installation is level, place the tiles on the head of the pedestals.

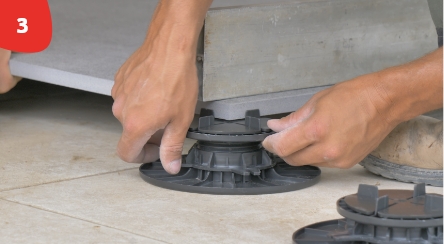
step 3Then adjust the height of the pedestals and check everything one last time with a spirit level.

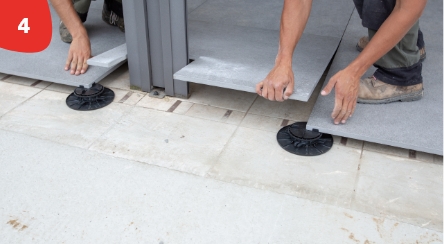
step 4Finally, make the cuts to close the terrace laterally.


Installation of the pedestals
Installation of slabs on pedestals
Adjusting the pedestals
Finishing the terrace
Data sheet

Model : 


Adjustable pedestal 8-20 mm for slabs, tiles or ceramics - Jouplast


JOUPLAST
ColorBlack
MaterialPolypropylene
Warranty10 years warranty
OriginManufactured in France
ResistanceResistant to acid and basic solutions, atmospheric agents, temperatures between -30°C and 60°C
LoadResisting the test of crushing with load superior in 500 kg
BrandJouplast
TypeAdjustable
Adjustable heightfrom 8 to 20 mm
SH Code39259010
Country of OriginUE
Spacer thickness3 mm
Installation surfaceLoose soil
Type of settingManual
Download
Find all the documents that will be useful to you for the realization of your projects
Videos & tutorials
How do I use the terrace pedestals? What is the difference between a wood pedestal and a slab pedestal? How do you adjust your pedestals to the right height?

Find the answers to your questions on video with tips and tricks from our experts.
How to install your terrace on pedestals?

Ceramic Terrace on pedestals

View the trust certificate
  • For further information on the nature of the review controls, as well as the possibility of contacting the author of the review please consult our Transparency Charter.
  • No inducements have been provided for these reviews
  • Reviews are published and kept for a period of five years
  • Reviews can not be modified: If a customer wishes to modify their review then they can do so by contacting Verified Reviews directly to remove the existing review and publish an amended one
  • The reasons for deletion of reviews are available here.

4.3 /5

Based on 82 customer reviews

  • 1
    5
  • 2
    3
  • 3
    5
  • 4
    21
  • 5
    48
Sort reviews by :

Vincent C. published the 17/04/2024 following an order made on 04/04/2024

5/5

Parfait

Antoine M. published the 15/04/2024 following an order made on 28/03/2024

4/5

Réglage compliqué par rapport aux plots plus haut « à visser » une fois la dalle posée

Benoit M. published the 30/03/2024 following an order made on 18/03/2024

5/5

Le produit est bien pensé pour le réglage. La cale amovible est un plus

Jean B. published the 04/03/2024 following an order made on 23/02/2024

5/5

Parfait

Claude L. published the 03/03/2024 following an order made on 27/02/2024

5/5

impeccable

Sylvain H. published the 17/02/2024 following an order made on 30/01/2024

5/5

Costaud

Anonymous customer published the 31/01/2024 following an order made on 24/01/2024

5/5

conforme à la commande

Jacky S. published the 31/12/2023 following an order made on 24/12/2023

5/5

Impeccable

Get advice from our experts!

Sign up now
to our newsletter

English (United Kingdom)
Change language