1. GETTING THE GROUND READY
The first step is to prepare the support on which the future terrace will be placed. Unlike other terrace laying methods, the preparation of the ground is carried out quickly and without the need for major works.
Place on rough, well-packed soil.
Start by delimiting the location of the terrace and make a disbursement of 15 cm. Place a geotextile felt there so as to prevent the growth of weeds between the slabs and cover it with crushed stone to create a draining foundation layer and stabilize the surface. Don't forget to compact everything.
Installation on concrete surface or stabilized ground
In this case, no preparation is required. Place the pedestals directly on the surface provided that it is stable.
Installation on soft or uneven ground
Take the necessary precautions: carry out a 15 cm earthwork then pour a concrete slab to make your surface stable and secure.
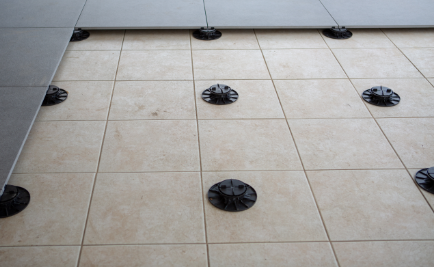
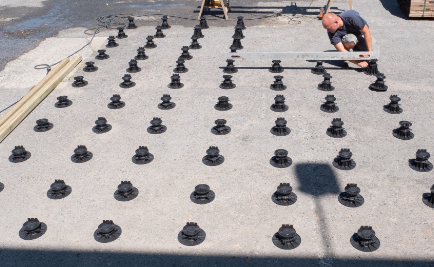
2. LAY THE PEDESTALS ON THE GROUND
It is the dimensions of your tiling slabs that define the spacing between each plot.
Lay the pedestals directly on the ground
This step requires no glue or screws. Space your pedestals evenly according to the dimensions of your pavings.
How many pedestals per tile paving?
As a general rule, plan for 1 pedestal at each corner of your pavings, i.e.: 4 pedestals for 1 paving. However, depending on the size of the tiling used, it may be necessary to add a 5th pedestal (from 60 x 60 cm per slab) in the center of the paving. For a large rectangular slab (from 120 cm wide) provide two additional pedestals.
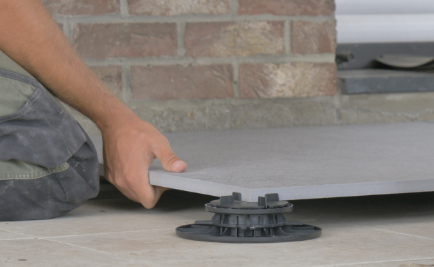
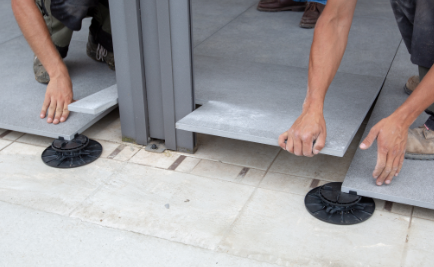
3. POSITION THE PAVINGS ON PEDESTALS & ADJUST THE HEIGHT
The slabs are placed directly on the head of the pedestals. Take a level and check the position of each tile you lay.
Wedge the slabs on the pedestals
The heads of the pedestals are made up of 4 lugs which are intended to wedge and hold the paving in place. In addition, they make it possible to predefine the spacing between each slab so as to allow the flow of rainwater.
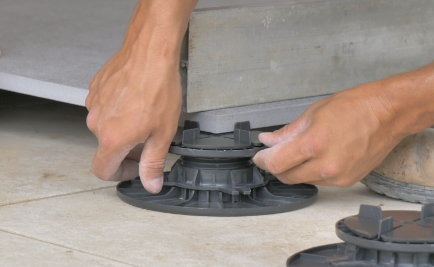
Height adjustment to the millimeter
Under the head of the pedestal there is a height adjustment ring: simply turn it to increase or decrease the size of the pedestal so that the tiles are level.
4. FINISH THE TERRACE
Once the pavings have been laid and the surface is level, the last step is to close the terrace laterally so as to hide the pedestals under the structure.
Close the terrace riser
After making the necessary cutouts, take accessories such as the cladding support and the slab plate to close your terrace laterally.
1. GROUND PREPARATION
The first step is to prepare the support on which the future terrace will be placed. Unlike other terrace laying methods, the preparation of the ground is carried out quickly and without the need for large works.
Place on rough, well-packed soil.
Start by delimiting the location of the terrace and make a disbursement of 15 cm. Place a geotextile felt there so as to prevent the growth of weeds between the slabs and cover it with crushed stone to create a draining foundation layer and stabilize the surface. Don't forget to compact everything.
Installation on concrete surface or stabilized ground
In this case, no preparation is required. Place the pedestals directly on the surface provided that it is stable.
Installation on soft or uneven ground
Take the necessary precautions: carry out a 15 cm earthwork then pour a concrete slab to make your surface stable and secure.
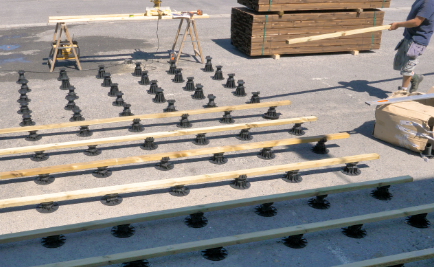
2. LAY THE PEDESTALS ON THE GROUND
Posez les plots directement au sol. Two notions are to be taken into account: the spacing of the pedestals and the center distance (distance between each joist).
Spacing wooden terrace pedestals
In general, respect a spacing of 70 cm between each pedestal. For heavy wood, choose a spacing of 50 cm instead.
What distance between joists?
The spacing, ie the distance between the joists, must be equal to 50 cm for softwood. For exotic wood, allow 40 cm.
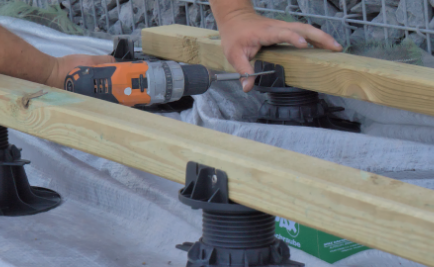
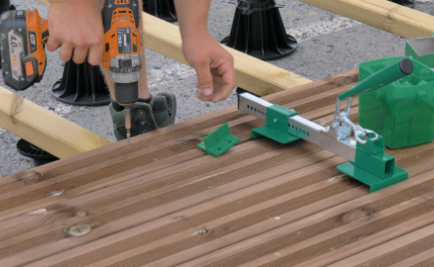
3. ATTACHING THE BEAM AND ADJUSTING THE PEDESTALS
The joists fit against the lug present on the head of the pedestal. This one has several pedestals to accommodate the screws.
Screw the joist to the pedestal
Take screws and fix the joist through the support tab on the head of the pedestal.
Adjustment of the plot to the millimeter
Under the pedestal head is a height adjustment ring: simply turn it to increase or decrease the size of the pedestal so that the surface is level.
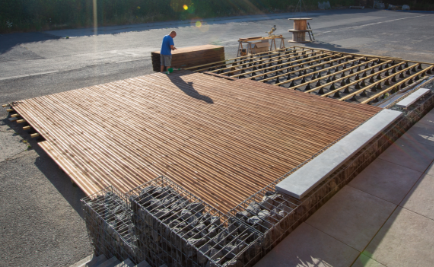
4. INSTALLATION OF TERRACE BOARDS
The fastening of the decking boards can be done invisibly or with screws.
In advance: protect your joists
It is recommended to use a protective strip for the joist in order to protect it from humidity and rainwater..
Attach decking boards
If you decide to use screws, be sure to maintain an even spacing between each board. We advise you to pre-drill the boards.
5. MAKE THE SIDE FINISHES
Once your wooden boards have been laid and fixed, all you have to do is finish the sides of your wooden terrace.
To do this, it's simple!
Measure the height needed for the side finishes
Make the necessary cutouts for closing your terrace.
Place fascia board horizontally
Screw the board into the joists.