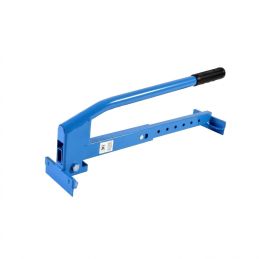
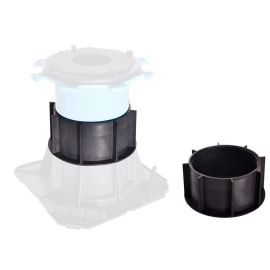
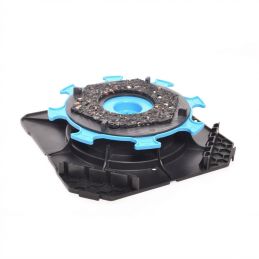
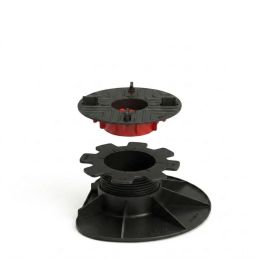
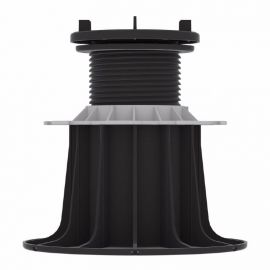
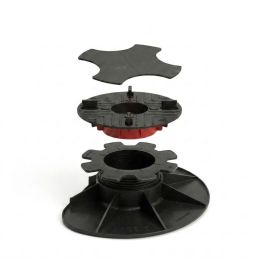
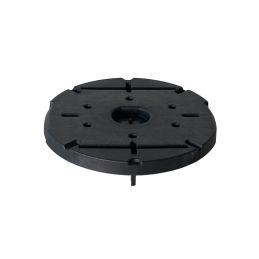
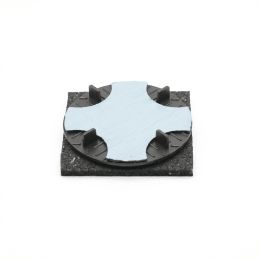
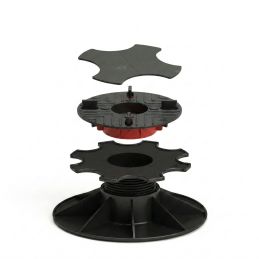
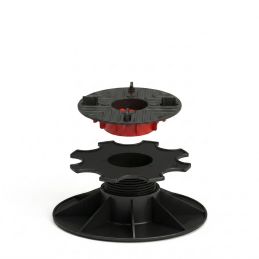
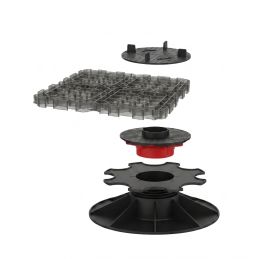
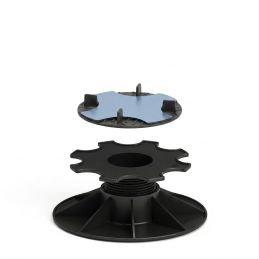
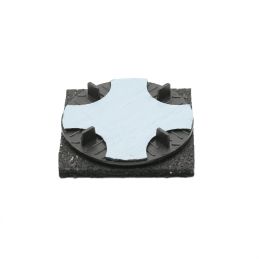
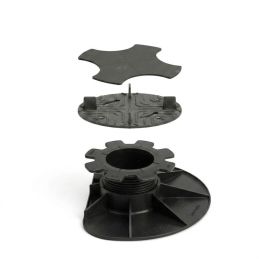
You cannot place a new order from your country. United States

Self-leveling pedestal for paving terrace H130/230 mm - CLEMAN range - Jouplast

JOUPLAST

Reference :

shipment in 24/48h
Your orders are shipped
Customer service
Our teams are at your disposal from Monday to Friday from 9am to 6pm
D.T.U. Standards
All our products comply with current standards
secure payment
Our site is protected by an SSL certificate
the guarantees plots-discount.com
Dessin technique du plot autonivelant Cleman 130/230 mm

Cleman self-leveling pedestal adjustable from 130 to 230 mm for paving terrace

To build a resistant and stable paving terrace on pedestals on uneven, poorly leveled or uneven ground, opt for Cleman self-leveling pedestals! Easy to set up, solid and adjustable from 80 to 130 mm, Cleman self-leveling pedestals allow you to create or compensate for a slope of up to 5% over 1 meter. Compatible with porcelain stoneware, concrete and wooden grating pavings, these self-leveling pedestals have many advantages.

The advantages of the Jouplast Cleman 130/230 mm self-leveling paving pedestal

  • Optimized side covering: 2 supports integrated into the flange
  • Easy corner installation: square flange shape
  • Acoustic rubber included
  • 4 spacers 4 mm thick, breakable to facilitate installation
  • Optimized stability: all the elements are interdependent
  • A range of dedicated accessories: riser, pavings plate, end cap and adjustment key.
  • Allows air to circulate under the structure
  • Allows the passage of cables and pipes

Tips for laying a tiled terrace on self-leveling pedestals

  • The installation of a terrace on Cleman self-leveling pedestals is exclusively intended for pedestrian and outdoor use.
  • The use of the Cleman tiled terrace pedestal is done on uneven, non-flat, poorly leveled ground or on an existing concrete paving 
  • Cleman self-leveling paving pedestals are used with self-supporting pavings, class T7 or T11 according to standard NF EN 1339 or F+.
  • Promote the flow of rainwater by providing an inclination of 1 cm per linear meter.

The steps for laying a paving terrace on an adjustable pedestal Cleman

1/ Preparing the ground

Unlike other terrace laying methods, which require time and a substantial budget, the solution of self-leveling pedestals only requires a slight preparation of the ground, easy to set up, rather quick and above all inexpensive. This preparation is mandatory to keep your terrace on pedestals for a long time. Without it, your unprepared ground will evolve over time (due to weight, climatic conditions such as drought and heavy rain) and cause your terrace to move. To protect yourself against this, work your ground with crushed gravel.

The self-leveling pedestals for pavings are perfect for laying on crushed gravel. Never really flat, the crushed gravel surface is mastered by the Cleman self-leveling pedestals which, with their pivoting heads, adapt perfectly to the terrain.

For the preparation of your land, here is the necessary equipment:


  • A cord
  • Stakes
  • A spirit level
  • A shovel
  • A tape measure
  • A mason's box screed
  • A geotextile film
  • Crushed gravel

The installation is quite simple:

  1. Dig the ground for 15 cm;
  2. Place a geotextile felt there to eradicate the growth of weeds and save you additional maintenance;
  3. Make a foundation layer of crushed gravel 0/31.5;
  4. Compact everything.

Your surface is now ready to accommodate your tiled terrace on pedestals! Obviously, if the surface hosting your new terrace is a concrete screed or an old terrace, do not go through the preparation of the ground but go directly to the laying of the self-leveling pedestals and pavings!

2/ Lay the self-leveling pedestals and pavings

Laying a tiled terrace on paving pedestals is a quick and easy process. In a short day's work, you will be able to enjoy your new outdoor tiled terrace for many years to come!


Good news, with Cleman self-leveling pedestals, it's even easier. This is thanks to the functionalities of these premium pedestals which adapt to the terrain and make your job easier with a series of accessories included for even more installation comfort (side trim included) and use (acoustic rubber included).

  1. Take your previously drawn up layout plan to lay your Cleman pedestals so that your pavings do not overlap. It takes 4 terrace pedestals per pavings for dimensions up to 60 x 60 cm. Beyond that, provide one or two central pedestals to be placed under the pavings by breaking the spacers;
  2. Once the ground has been prepared, it is time to lay the first tiled terrace pedestal on the ground. Adjust the height of these foundation supports using the gray adjustment nut located under the head of the pedestals, you can adjust the height to the nearest millimeter with the Cleman adjustment wrench if necessary. This adjustment key is ideal for post-installation height adjustment;
  3. Finally, lay the pavings on the tiled terrace pedestals. The 4 spacers of 4 mm (separable) make it easier to install while firmly wedging the terrace paving on the pedestal for optimal support. The weight of the paving on the pedestal keeps the pedestal in place without moving a single millimeter. You will notice it very quickly, the installation is greatly facilitated since the Cleman paving terrace pedestals have a square base, ideal for installation at an angle or against a wall. In addition, two trim supports and glue traps keep the skirting boards vertical for a flawless aesthetic finish.

Accessories for laying a tiled terrace on a self-leveling pedestal Cleman

The Cleman self-leveling pedestal being well thought out, it is equipped with integrated accessories which aim to make you gain in speed and comfort of installation but also to reduce the invoice in accessorization. Thus, only a few essential accessories are necessary, namely:

  • The 60 mm Cleman riser allows you to increase the height of your Cleman paving terrace pedestal without changing it. Up to 4 risers can be stacked per Cleman pedestal;
  • The paving plate for Cleman pedestal adapting to the two Cleman cladding supports and facilitating installation against the facade;
  • The Cleman adjustment key slipping between the pavings of your terrace to adjust the height of the pedestals after installation without having to disassemble anything;
  • The Cleman pedestal adjustment ends fitting on the chuck of an electric screwdriver and allows the height adjustment of Cleman self-leveling pedestals.

Technical characteristics

  • Complies with DTU 43.1
  • Load resistance greater than 1 ton
  • Frost and UV resistant
  • Dimensions: 192 x 192mm
  • Head diameter: 138 mm
  • Adjustable height: 130 to 230 mm
  • Adjustment via the blue nut and adjustment from above with the Cleman wrench
 
The steps of installation a terrace on pedestals

The installation of a terrace on a pedestal is the easiest and quickest method to set up: follow the assembly steps and build your terrace in less than 3 days!


step 1Determine the required spacing, place the pedestals on the ground, adjust them and check everything with a spirit level.

step Once the installation is level, place the tiles on the head of the pedestals.

step 3Then adjust the height of the pedestals and check everything one last time with a spirit level.

step 4Finally, make the cuts to close the terrace laterally.


Installation of the pedestals
Installation of slabs on pedestals
Adjusting the pedestals
Finishing the terrace
Data sheet

Model : 


Self-leveling pedestal for paving terrace H130/230 mm - CLEMAN range - Jouplast


JOUPLAST
MaterialPolypropylene
OriginManufactured in France
ResistanceResistant to acid and basic solutions, atmospheric agents, temperatures between -40°C and 60°C
BrandJouplast
TypeSelf-levelling
Adjustable height130 to 230 mm
StandardCompatible with waterproofing system (compliant with DTU 43.1) - CE certification
Spacer thickness4 mm
Acoustic damper includedYes
Installation surfaceUneven/Inclined ground
Type of settingFrom the top
Download
Find all the documents that will be useful to you for the realization of your projects

FT_PLOT AUTONIVELANT CLEMAN

FT_PLOT AUTONIVELANT CLEMAN_en

Télécharger
View the trust certificate
  • For further information on the nature of the review controls, as well as the possibility of contacting the author of the review please consult our Transparency Charter.
  • No inducements have been provided for these reviews
  • Reviews are published and kept for a period of five years
  • Reviews can not be modified: If a customer wishes to modify their review then they can do so by contacting Verified Reviews directly to remove the existing review and publish an amended one
  • The reasons for deletion of reviews are available here.

4.7 /5

Based on 17 customer reviews

  • 1
    0
  • 2
    1
  • 3
    0
  • 4
    3
  • 5
    13
Sort reviews by :

Corinne B. published the 20/02/2024 following an order made on 14/02/2024

5/5

Matériel de qualité

Sylvain G. published the 23/12/2023 following an order made on 10/12/2023

5/5

ras conforme a la description

Anonymous customer published the 01/11/2023 following an order made on 20/10/2023

5/5

RAS.

Celine C. published the 31/10/2023 following an order made on 12/10/2023

2/5

Deux plots sur trois reçus cassés Déçue

GREGORI G. published the 21/05/2023 following an order made on 05/05/2023

5/5

Très bons produits

Nicolas M. published the 08/05/2023 following an order made on 16/04/2023

5/5

Très bien, les plots autonivelants ont permis d'avoir une surface plane même avec ma dalle irrégulière. Si on connait les petits détails c'est très facile à poser.

Dominique L. published the 01/03/2023 following an order made on 13/02/2023

5/5

conforme

Benjamin J. published the 01/03/2023 following an order made on 12/02/2023

4/5

Efficaces. Attention je n’ai vu qu’après la commande et sur le site du fabricant jouplast (fiche technique en format pdf) que les plots non auto-nivelant sont conseillés pour les bords de la terrasses

Get advice from our experts!

Sign up now
to our newsletter

English (United Kingdom)
Change language