You cannot place a new order from your country. United States

Redo your terrace: opt for a terrace on pedestals!

Can't stand your old patio anymore? To modernize your exterior without demolishing everything, consider installing a terrace on pedestals! Fast, economical and practical, this type of installation is ideal when the surface is stable, such as on an existing terrace. Go from a dilapidated terrace to a competition terrace in a few operations that we will present to you in this article.

Why a terrace on pedestals?

To renovate an old, outdated or poorly designed terrace, there is nothing better than opting for the installation of a terrace on pedestals. This type of installation has several advantages:

Simple, quick and easy to make

Laying a terrace on pedestals does not require major work or heavy equipment. No need to glue, seal or even make joints between the tiles. No need to go through a tiler, you can easily renovate your old terrace with a terrace on pedestals. Even better, your old terrace will make the job easier since the surface will be stable. For the installation of a terrace on pedestals in outdoor tiling for example, count a few hours of work.

Allows you to make up for the defects of your old terrace

The terrace you want to cover has cracks, the seals are gone? Do not panic, these defects do not prevent the installation of terrace pedestals! Note, if your old terrace is flat, you just need to have pedestals of the same height at a good distance. Do not forget to leave space between your old terrace and your terrace on pedestals to allow any cables to pass or simply to let rainwater drain away. Thanks to the wide choice of heights, you can raise your terrace on pedestals by just a few millimetres! Count 8 mm at YEED (ex Rinno) and 10 mm minimum at Jouplast.

If your previous terrace is not level, consider self-leveling pedestals. Available in different heights, these pedestals make it possible to create or compensate for a slope of up to 5% over 1 meter. Thus, your surface irregularities are erased and you benefit from a modern and totally successful terrace on pedestals.

A much nicer terrace

The particularity of terraces on pedestals is that they are not in direct contact with the ground. Thus, protected from heat and humidity, your terrace is much more comfortable. Forget the scorching outdoor tiled terraces in good weather. Your new terrace on pedestals is insulated from the ground and protects you from unpleasant surprises.

In addition, the installation of pedestals allows you to completely personalize and modernize your outdoor space. By opting for example for pavings of 60 x 60 cm or 80 x 80 cm you create a terrace with a contemporary look. The wide selection of outdoor porcelain stoneware tiles helps you in this.

terrasse dalle imitation bois en cours de réalisation sur ancienne dalle

It doesn't cost much

Thanks to its simplicity of installation, the terrace on pedestals is economical. DIY fan, no doubt your terrace on pedestals will cost less than making a glued terrace. In addition, when the latter is damaged, if you want to renovate it, you will have to break everything to make a new one. However, with the pedestal technique, all you have to do is replace the damaged paving with a new one and your terrace will be like new again!

The stages of renovating your terrace

Start by cleaning your old terrace and then draw up a precise layout plan. This step will allow you to know where to position your tiles, and to measure the distances between each of them. For this step, take a tape measure and a marking thread to make your marking on the ground. Once these measurements have been made, you will have a grid over your entire old terrace. the layout plan may seem complicated to set up for a novice, to help you we have written a layout guide, discover it!

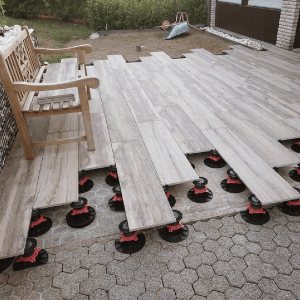
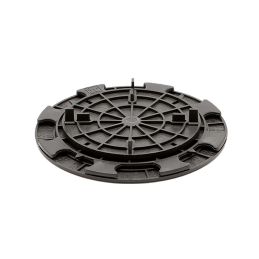
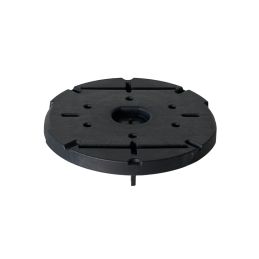
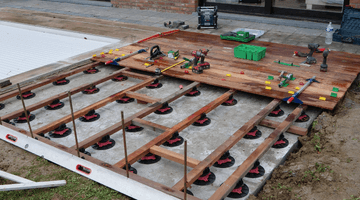
This is the time to position your pedestals on each intersection, at the right distance according to the dimensions of the slabs (every 60 cm for a 60 x 60 cm slab for example). As a reminder, from 60 x 60 cm add a central plot, from 120 cm, two central plots. When adjusting the height of your pedestals, to allow good drainage of rainwater, adjust a slight slope of 1 to 2 mm/m. Regarding the corners of the terrace, do not forget the use of slab plates. These accessories for pedestals ensure the perfect stability of the slab. To help you lay your slab terrace correctly, with step-by-step help, head to this article!

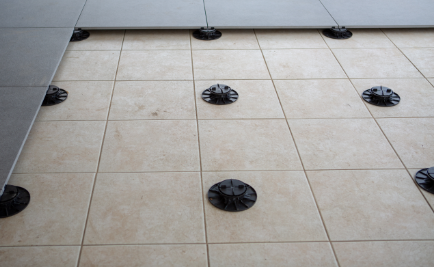
Are your pedestals installed? All you have to do is lay your tiling tiles on them. For a perfectly level floor, use a level and, above all, take your time progressing row by row.

You now benefit from a pretty, renovated, modern and welcoming terrace, which you can easily change over the next few years if you feel like it. Until then, all you have to do is enjoy your new terrace on pedestals!

The ideal pedestals for renovating your terrace:

  • -30% Off
    Reduced price!
  • -46% Off Best Seller
    Reduced price!
  • -41% Off
    Reduced price!

To take things up a notch:


Get advice from our experts!

Sign up now
to our newsletter

English (United Kingdom)
Change language