You cannot place a new order from your country. United States

Adjustable pedestal 25/40 mm for wooden deck - YEED (ex Rinno)

YEED (Ex Rinno)

Reference :

Available stock

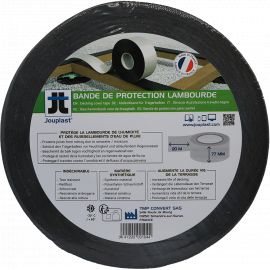
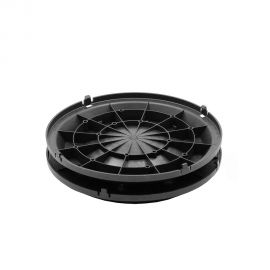
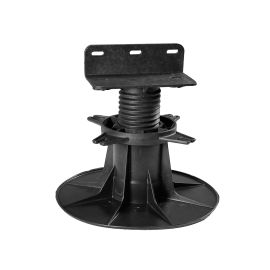
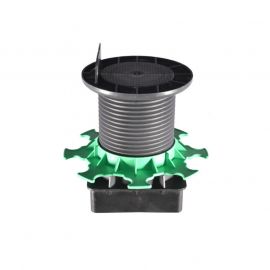
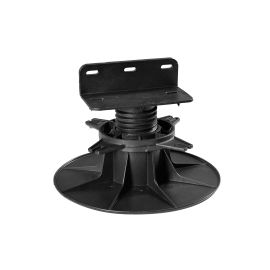
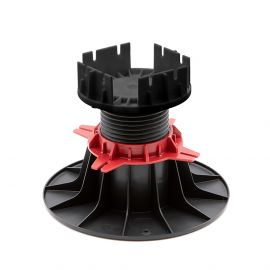
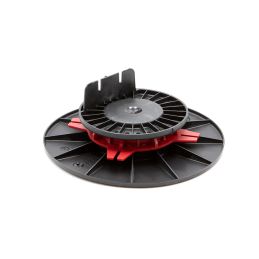
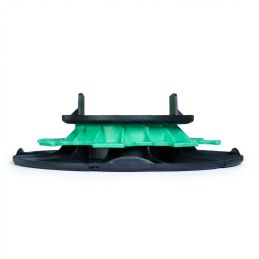
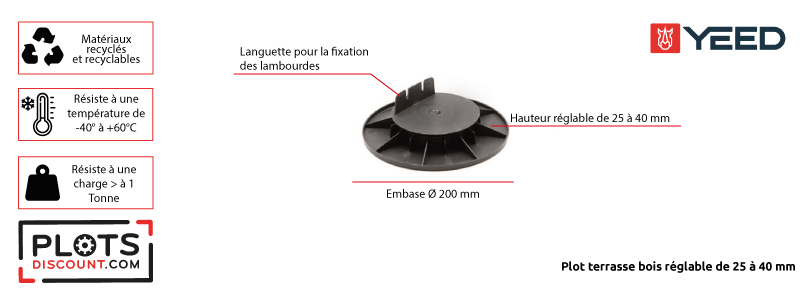
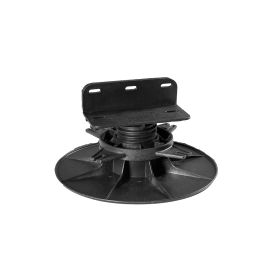
Adjustable joist pedestal from 25 to 40 mm for wood and composite decking. Direct laying on the ground without fixing, quick and easy installation. Made in France, compliant with DTU 43.1 and 51.4. Load resistance 1 ton. 10 year warranty. More details

shipment in 24/48h
Your orders are shipped
Customer service
Our teams are at your disposal from Monday to Friday from 9am to 6pm
D.T.U. Standards
All our products comply with current standards
secure payment
Our site is protected by an SSL certificate
the guarantees plots-discount.com
Dessin technique du plot terrasse bois 25/40 Yeed

Wooden or composite terrace pedestal adjustable from 25 to 40 mm - YEED (ex Rinno)

This pedestal for terrace serves as a foundation for wooden terraces, whether exotic, resinous or composite. Adjustable from 25 to 40 mm, it accommodates the joists to support the structure of your terrace. Without fixing or structural work, the wooden terrace pedestal is an economical and practical solution to get a wooden terrace out of the ground.

The advantages of the 25/40 mm wooden terrace pedestal from YEED (ex: Rinno)

  • Quick and easy installation, without major works or fixing
  • Manual height adjustment thanks to the adjustment ring
  • Strip designed for screwing the joist onto the pedestal
  • Allows good ventilation of the structure and the evacuation of rainwater
  • Base designed to ensure proper drainage of rainwater
  • Compatible with wood and composite boards

Prerequisites: draw up the layout plan

To know the number of pedestals required and their layout, it is essential to draw up a layout plan before installation. This plan will allow you to project yourself in the realization of your wooden terrace on pedestals. First of all, begin by reporting the shape and dimensions of your future landscaping and then study the number of pvc plots, joists and wooden boards that will be required for your project.

Ground preparation

Preparing the ground that will accommodate your wooden terrace on pedestals is essential. With poor weather and the weight supported by your construction, your terrace may have to move. To avoid this, prepare the ground to stabilize it and enjoy your terrace for many years!

On a concrete paving or an existing terrace

If you have a concrete screed or an old terrace, good news, your surface does not require any preparation! Yes, your ground is stable and level, so now all you have to do is install the wooden terrace pedestals.

On a rough ground

1/ Tools and materials required for soil preparation

Few tools are required to prepare the ground. Here is the list of everything you need:

  • A cord
  • Stakes
  • A spirit level
  • A shovel
  • A tape measure
  • A mason box screed
  • A geotextile film
  • Crushed gravel
  • Roller compactor

2/ How to prepare the ground

Only 5 steps will allow you to go from raw ground to a stabilized ground:

  1. Define the shape of your terrace and dig 15 cm deep;
  2. Lay a geotextile felt to prevent the growth of weeds between the wooden boards;
  3. Backfill with crushed gravel: 0/60 mm over 10 cm and 0/4 mm over the top 5 cm;
  4. Compact everything to obtain a flat and loose surface;
  5. Check the flatness of the surface using a spirit level.

Steps for laying a wooden terrace on YEED pedestals (ex Rinno)

Laying a wooden terrace on pedestals is relatively simple and quick. A weekend should be enough to complete your project.

1/ Tools and materials needed to lay a wooden deck on YEED pedestals (ex Rinno)

  • A bracket
  • One meter
  • A spirit level
  • A drill driver
  • A jigsaw/radial saw
  • A hammer
  • A large ruler
  • A cord
  • Stakes
  • Your Rinno wooden terrace pedestals
  • Wooden or aluminum joists
  • decking boards
  • Special wooden screws

2/ Accessories for laying a deck on a pedestal

Building a wooden deck on pedestals is quick and easy. A few accessories will help you in this outdoor landscaping project, namely:

3/ Arrange the pedestals on the ground

With the help of your layout plan, arrange the wooden terrace pedestals following these spacings:

  • Start by placing joist pedestals every 50 cm for the location of your joists. The latter must be supported all along with a spacing of 70 cm.
  • Once placed on the ground, adjust the height of each of the pvc studs using their adjustment ring. Make sure you leave a slight slope (1.5%) to promote the evacuation of rainwater.

4/ Lay and fix the joists

The joists, which are at the core of your terrace foundations on pedestals, must be chosen with great care. Always take joists of the same species as your wooden slats, opt for aluminum joists but do not use composite joists. These will change over time.

  1. Lay the joists against the strip located at the head of the pedestals;
  2. Screw the joists onto the pedestals through the tongue;
  3. Apply the protective strip along the length of the joists;
  4. Cover the edges of the joist with the protective strip.

5/ Lay the covering boards

Lay the wood slat covering starting against a wall. Shift 5 mm to obtain the expansion joint;

Place the boards perpendicular to the joists;

Screw the boards 20 mm from the edge with special decking screws.

Carry out the side finishes of the terrace

To make the side closure of your wooden terrace, there are only 3 small steps:

  1. Measure the height and make the necessary cutouts;
  2. Place the fascia board horizontally;
  3. Screw the plank into the joist.

Technical characteristics

  • Complies with DTU 43.1 and 51.4
  • Frost and UV resistant
  • Supports up to 1 ton of load
  • Height adjustable from 25 to 40 mm
  • Base diameter: 200 mm
  • Head diameter: 120 mm
  • Strip height: 29 mm
  • Recycled and recyclable product
  • Made in France
 
The steps of installation a terrace on pedestals

The installation of a terrace on a pedestal is the easiest and quickest method to set up: follow the assembly steps and build your terrace in less than 3 days!


step 1Determine the required spacing, place the pedestals on the ground, adjust them and check everything with a spirit level.

step 2As soon as the installation is level, place the joists in front of the pin located on the head of the pedestals.

step 3Then screw the joists onto the pin of the stud provided for this purpose. This allows for good maintenance.

step 4Finally, attach the wooden slats to the joists using a screwdriver and wood screws.


Install the pedestals
Install the joists
screwing of the joists to the pedestals
Fixing the terrace boards
Data sheet

Model : 


Adjustable pedestal 25/40 mm for wooden deck - YEED (ex Rinno)

 
The...
YEED (Ex Rinno)
ColorBlack
MaterialPolypropylene
Warranty10 years warranty
OriginManufactured in France
ConformityCompliance with the DTU 43.1 and 51.4
ResistanceResistant to acid and basic solutions, atmospheric agents, temperatures between -40°C and 60°C
LoadResists the test of crushing with a load superior in 1 ton
BrandYEED (Ex Rinno)
TypeAdjustable
UseWooden slab, Composite slabs
Adjustable height25 to 40 mm
Compatibility with extensionNo
SH Code39259010
Country of OriginUE
Installation surfaceLoose soil
Type of settingManual
Download
Find all the documents that will be useful to you for the realization of your projects

Decking pedestal 25-40 YEED

Decking pedestal 25-40 YEED_en

Télécharger

Click on a thumbnail to load the video

View the trust certificate
  • For further information on the nature of the review controls, as well as the possibility of contacting the author of the review please consult our Transparency Charter.
  • No inducements have been provided for these reviews
  • Reviews are published and kept for a period of five years
  • Reviews can not be modified: If a customer wishes to modify their review then they can do so by contacting Verified Reviews directly to remove the existing review and publish an amended one
  • The reasons for deletion of reviews are available here.

4.6 /5

Based on 267 customer reviews

  • 1
    4
  • 2
    2
  • 3
    10
  • 4
    55
  • 5
    196
Sort reviews by :

Aurélia G. published the 18/03/2024 following an order made on 05/03/2024

5/5

Correspond à mes attentes. Le colis a été expédié le lendemain, la commande est arrivée en deux jours. Il manquait quelques plots. Un coup de tel au SAV et un nouveau colis a été envoyé dès le lendemain. La conseillère a été très aimable et à l'écoute, merci beaucoup pour le service de qualité.

Manuel H. published the 02/03/2024 following an order made on 23/02/2024

5/5

Très bien, conforme à mes attentes, je recommande !

Marc V. published the 20/02/2024 following an order made on 07/02/2024

5/5

Correspond à mes attentes

Bernard B. published the 18/02/2024 following an order made on 12/02/2024

5/5

Ras,parfait

Basile B. published the 17/02/2024 following an order made on 04/02/2024

5/5

Bien.

Anonymous customer published the 17/02/2024 following an order made on 04/02/2024

2/5

La hauteur maximale des plots 25/40 n'atteint pas les 40mm. Il manque 3 à 4 mm. A prendre en compte dans un projet.

Pascal P. published the 24/10/2023 following an order made on 16/10/2023

4/5

Pas vraiment sophistiqué comme plot, mais pour le prix, c'est bien.

Patrick D. published the 29/09/2023 following an order made on 20/09/2023

5/5

Conforme à mes attentes

Get advice from our experts!

Sign up now
to our newsletter

English (United Kingdom)
Change language